 Mesh Node / Pod
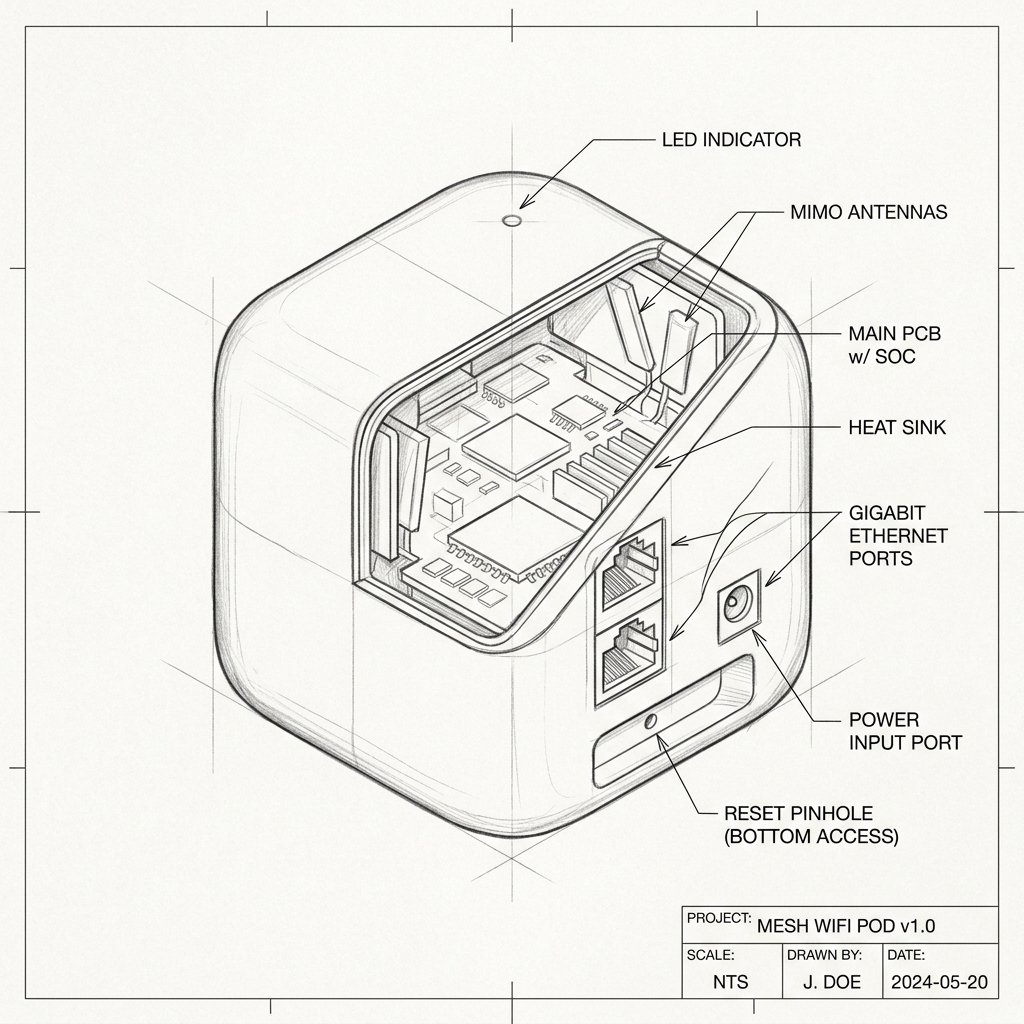
Cox Panoramic Wifi Pods 2.0 Diagram
Reference this technical blueprint during setup to locate the power input, status LED indicators, one-touch WPS pairing button, and Ethernet port on your device.
Cox Panoramic Wifi Pods 2.0 extend your home WiFi coverage and help reduce dead zones by creating a mesh network with your Panoramic Wifi Gateway. Setup and activation are completed through the Cox Panoramic Wifi app.
Before You Begin
- Make sure your Cox Panoramic Wifi Gateway is powered on and connected to the internet.
- Confirm that your Cox Panoramic Wifi service is active.
- Download the latest Cox Panoramic Wifi app on your smartphone or tablet.
- Sign in to the app using your Cox primary user ID and password.
- Turn on Bluetooth and allow the app to access your phone’s location if requested.
- If you have first-generation Cox Pods installed, disconnect them before activating Pods 2.0. You can reconnect the older Pods after the new Pods 2.0 are activated.
Set Up the First Pod 2.0
Step 1: Open the Cox Panoramic Wifi App
- Open the Cox Panoramic Wifi app on your smartphone or tablet.
- Sign in with your Cox account credentials.
- Tap Account or More, depending on the version of the app.
- Select Activate Panoramic Wifi Pods or Add a device.
- Tap Get Started to begin the activation process.
Step 2: Plug In the Pod
- Plug the first Pod 2.0 into an open electrical outlet.
- Place it in a room at least one room away from the Panoramic Wifi Gateway, approximately 20–30 feet from the gateway.
- Do not place the Pod inside a cabinet, behind furniture, or directly next to the gateway.
- Wait for the Pod’s light to turn on or begin flashing.
Step 3: Activate the Pod
- Hold your smartphone or tablet a few inches from the Pod when the app asks you to do so.
- The app may scan the Pod or identify it automatically.
- If prompted, scan the QR code printed on the Pod or its packaging.
- Follow the on-screen instructions to add the Pod to your Cox network.
- Wait while the app connects the Pod to your Panoramic Wifi Gateway.
- When activation is complete, the app will confirm that the Pod is connected.
Add More Panoramic Wifi Pods 2.0
Step 1: Choose a Location
- Place additional Pods between the gateway and areas where WiFi coverage is weak.
- Do not place a Pod inside the dead zone because it may not receive a strong enough signal.
- Place it just outside the weak coverage area so it can communicate with the gateway or another Pod.
- Keep Pods evenly spaced throughout the home.
Step 2: Add the Pod in the App
- Plug the additional Pod into an open wall outlet.
- Open the Cox Panoramic Wifi app and select Add Panoramic Wifi Pod.
- Hold your phone close to the Pod when prompted.
- Scan the QR code if the app requests it.
- Wait until the app confirms that the Pod has been added successfully.
- Repeat these steps for each additional Pod.
Step 3: Name Your Pods
- Give each Pod a location name, such as Living Room, Bedroom, or Office.
- Naming Pods makes it easier to identify their status and troubleshoot them in the Cox app.
Best Placement for Pods 2.0
- Place the first Pod about one room away from the gateway, approximately 20–30 feet apart.
- Place additional Pods evenly between the gateway and weak-signal areas.
- Keep Pods off the floor when possible.
- Avoid placing Pods near mirrors, metal objects, bathrooms, refrigerators, microwaves, cordless phones, and large appliances.
- Do not place a Pod inside a cabinet or behind thick furniture.
- Keep metal objects from blocking the path between the gateway and Pods.
Check Pod Status in the Cox App
- Open the Cox Panoramic Wifi app.
- Go to the network, devices, or Pods section.
- Check whether each Pod shows as Online or Connected.
- If a Pod shows an error or offline status, move it closer to the gateway and restart it.
- After installation, allow the system two to three days to optimize device connections and network performance.
Connect Devices to the Pod Network
You do not need to connect devices to a separate Pod WiFi name. Once the Pods are activated, they become part of your existing Cox Panoramic Wifi network.
- Use your normal Cox WiFi name and password.
- Your phone, laptop, smart TV, and other devices will automatically detect the mesh network.
- Devices can move between the gateway and Pods as you move around your home.
- Restart a device if it remains connected to a distant access point after the Pod is installed.
Important: Wired Backhaul
Cox Panoramic Wifi Pods 2.0 are designed to connect wirelessly to the Panoramic Wifi Gateway. Do not assume that connecting an Ethernet cable will create a wired backhaul, because wired-backhaul support may not be available for Pods 2.0.